さすがにdcokercon14が開催されているということもあって、Dockerネタで2日連続で記事を掲載してきたか…。 ということで、この記事も日本語訳してみることにする。(超訳っぽいところは、寛大な心をもって読んでください。)
尚この記事を読む前にDcokerのドキュメントのRuntime Privilege and LXC Configurationの部分に目を通しておくと良いかもしれない。Datadog agentをインストールするコンテナは、このPrivilege機能を使って他のコンテナの情報にアクセスしていると思う。
Docker-ize Datadog with agent containers
Docker-ize Datadog with agent containers (原文)
Docker is an exciting technology that offers a different approach to building and running applications thanks to a clever combination of linux containers (good for ops) and a git-like approach to packaging software (good for dev) so that your containers have everything they need to run without dependencies.
Dockerは、アプリケーションシステムを構築し運用するための刺激的なテクノロジーです。 このテクノロジーは、Linuxコンテナとgitのようなソフトウェアパッケージングの巧みな組み合わせのおかげで、他に依存することなくそれ自身で完全に動作することができます。
Many of you who are using Docker are embracing the Docker way and taking a container-only approach. As we release our new Docker integration, we don’t want to force you to break from a container-only strategy because of the traditional Datadog agent architecture. Instead, we’ve also embraced the Docker way and we’re pleased to announce a Docker-ized Datadog agent deployed in a container.
Dockerを採用しているユーザーは、Dockerの一般的な用法(the Docker way)に従い自分たちのアプリケーション用コンテナのみを起動するアプローチ(container-only approach)を採用しているでしょう。 DatadogがDocker用の新しいIntegrationをリリースしたのは、旧バージョンのDatadog agentのアーキテクチャの問題で、Datadogユーザーが、container-onlyアプローチを断念してほしくなかったからです。DatadogではDocker用の新しいIntegrationにとどまらず、Dockerの一般的な用法(the Docker way)に従い、Datadog agentをインストールしたコンテナも準備しました。
The Docker philosophy
First, a brief introduction on how infrastructure is set up with Docker. In Docker, each of your applications is isolated in its own container. The blueprint for a container is its DockerFile which is a set of steps to create the container. These steps build the standard binaries and libraries and install your application’s code and its dependencies such as Python, Redis, Postgres, etc.
まず、Dockerでどのようにシステムインフラがセットアップされるか簡単に紹介します。 Dockerでは、各アプリケーションはコンテナごとに隔離されています。 各コンテナの設計図であるDockerFileには、コンテナの中身を設定していく手順が記述されています。 この設定手順には、標準的なバイナリやライブラリをビルドしたり、アプリケーションのコードとそのアプリケーションが依存するPython、Redis、Postgresなどの依存ファイルをインストールする手順が記述されています。
The Docker engine then creates the actual container to run using namespaces and cgroups. These are two features found in recent versions of the Linux kernel used to isolate system calls and resource usage (CPU, memory, disk I/O, etc.) directly on your server. The end result is multiple containers on the server with each application thinking it is in its own machine by itself, without the overhead associated with fully-virtualized machines.
Dockerエンジンは、名前空間とcgroupsを使用し実行用の実コンテナを準備します。 最近のLinuxカーネルは、これらの名前空間とcgroupsの機能を使い、システムコールの隔離とホストサーバ上のリソース(CPU, memory, disk I/O, etc.) に対する利用制限を実現しています。結果従来型の仮想化技術のようなパフォーマンス低下の影響をうけることなく、ホストサーバ上の個々コンテナ内のアプリケーションは、個別のマシンを占有し動作しているのと同じ状態になります。
The traditional Datadog set-up
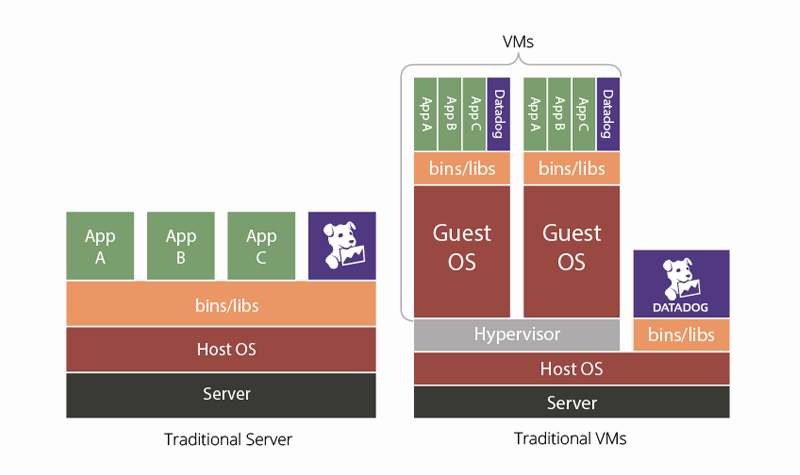
Until Docker arrived, applications were built in virtual servers or directly on raw servers. In this case, you install the agent on your server and decide what applications and services you want to monitor in Datadog. If you want to send custom metrics to Datadog, you instrument your application with our Datadog version of StatsD, called DogStatsD. This set-up is illustrated below.
Dockerが一般化する以前は、アプリケーションは物理サーバか従来型仮想サーバ上に構築されていました。このような場合では、各サーバにDatadog agentをインストールし、監視対象のアプリケーションやサービスを決めていきます。任意のメトリックス(指標)をDatadogに転送したないなら、DogStatsD(DatadogバージョンのStatsD)を使って、アプリケーションにメトリック(指標)採取用のコードを追記することになります。
Datadog agentの配置は、次のような配置になります。

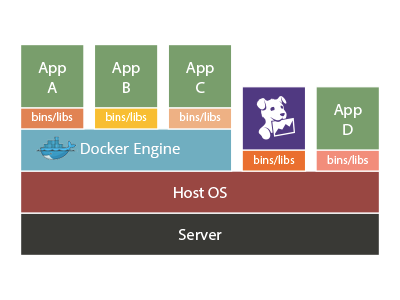
The traditional Datadog set-up in the Docker environment means the Datadog agent runs next to the Docker engine.
Docker環境での伝統的なDatadogのセットアップでは、Datadog agentをDokcerエンジンのとなりで起動していました。

Datadog the Docker Way
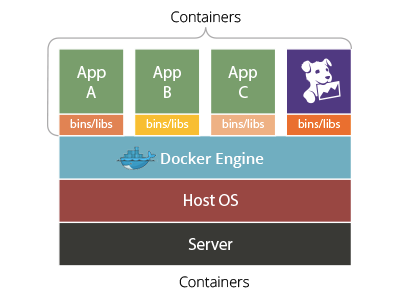
Because the Docker philosophy is to isolate applications to a container, we have built a “Docker-ized” installation of the Datadog agent. We have isolated the agent into two kinds of Docker containers. Both of the container installations can be illustrated by the diagram below.
Dockerの哲学がアプリケーションをコンテナに収納しそれぞれを隔離することなので、Datadogでも“Docker-ized”(コンテナに収納)したDatadog agentを作ってみました。
下記に示すdd-agent&dogstatsdコンテナ又はdogstatsdコンテナは、次の図のような配置になります。

The first container includes the Datadog agent plus DogStatsD. The Datadog agent is responsible for sending us both native host and container-specific metrics, like number of containers, load, memory, disk usage, and latency. DogStatsD will send us custom metrics you have instrumented in containerized applications. Again, you can read more about what exactly Datadog monitors in Docker in our Monitor Docker with Datadog post.
最初に紹介するコンテナには、Datadog agentとDogStatsDがインストールされています。 このコンテナのDatadog agentは、Dokcerをホストしているサーバとコンテナ固有のメトリック(指標)の両方を送信します。例えば、コンテナ数、負荷、メモリ、ディスク使用量、レーテンシー時間等が含まれます。DogStatsDは、コンテナ内に収めたアプリケーションに設定した任意のメトリックス(指標)を転送します。Datadogが、Dockerに関し収集しているメトリックスの詳細を調べる方法を知りたい場合は、Monitor Docker with Datadogの記事を参照してください。
1 2 3 4 | |
If you only want to monitor custom metrics in containerized applications, the other Datadog container isolates DogstatsD so that you can send us custom metrics to monitor.
コンテナ内のアプリケーションの任意のメトリックス(指標)のみを監視したい場合は、DogstatsDを収納した別のDatadogコンテナ(dogstatsdコンテナ)を利用します。 このコンテナを利用することで、任意のメトリックス(指標)をDatadogに送信することができるようになります。
1 2 3 4 | |
For detailed documentation on how to install the Docker-ized Datadog containers, please visit our Docker installation guide.
Docker-ized Datadogコンテナのインストール方法に関する詳細は、Docker installation guideを参照してください。
As mentioned in the Monitor Docker with Datadog post, if you would like to alert on and visualize Docker metrics, you can sign-up for a 14-day free trial of Datadog. Docker metrics will be available immediately after installing the Datadog agent in its traditional format or as a container.
先のMonitor Docker with Datadogの記事でも書いたように、Dockerのメトリックス(指標)を使って状況の可視化や通知をしたい場合は、14日間のフリートライアルを試してみてください。 Datadog agentをインストールした後、直ちにDockerエンジン、コンテナ、ホストマシンのメトリックス(指標)を監視できるようになります。
by ZAHEDA HAIDRI (Datadog, Inc)